
 AV setup & RaspPi control
Comments: 0
Introduction
From the previous blog the main goal of this home control/automation project is to replace the AV remote controls in our house (and their complex sequence of button presses to get anything done) with a single interface that is easy to use, works on any smartphone/tablet and doesn't need any apps to download or update.
A Raspberry Pi was selected for it's capability to control all the AV components as well as being power-efficient, quiet and small enough to fit in with the AV system. The Pi serves up a mobile website to smartphones & tablets on our home WiFi.
Also integrated to the project are a British Gas Hive central-heating system and some LightwaveRF light dimmers, power sockets, motion sensors and door/window switches.
Medium term plans include:
- alarm system (based on occupancy sensing with push notifications/SMS)
- semi-automated lighting (soft-light wake up alarms, automated hallway lighting in the wee hours, etc)
- automated travel & weather detection/reporting for our commute
This blog entry describes how the AV components are connected and gives an overview of the Raspberry Pi mobile-web control system.
Future blog entries will cover things like:
- how I set up the Pi from scratch
- deeper technical dives into reverse engineering APIs for AV equipment
- code snippets of the control system
- any new bits added to the system, etc
If you like this blog please give it a Like, Tweet or +1 below, thanks!
A Pit of Mating Snakes!
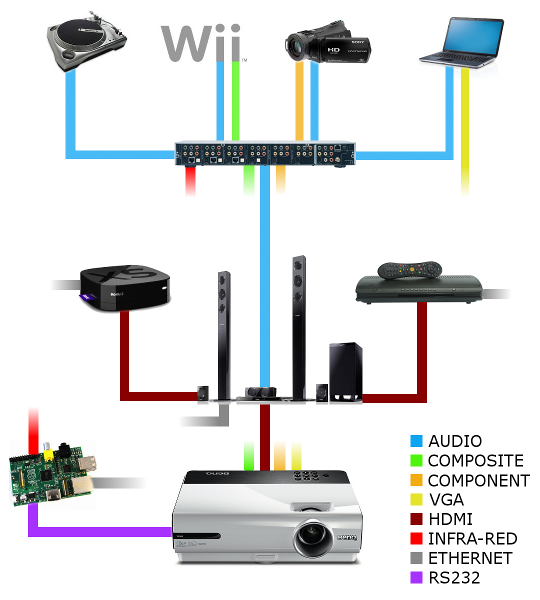 This diagram details how the AV system is connected, using coloured lines to shows the flow of different signal types, eg: stereo audio is blue, composite video is green, component video is orange, etc.
The four components at the top of the diagram (turntables/mixer, Wii, handycam and laptop) all feed into a 4-port AV switch where each port can switch composite video, component video, S-video, stereo audio & digital audio.
The video signals from the switch go directly to the projector, while the audio is routed to the Panasonic surround sound system. The Panasonic has a built-in Blu-Ray player, iPhone/iPod dock, radio and Skype camera connection.
The Panasonic has 2x HDMI inputs which the Virgin Media cable TV box and Roku media streamer are plugged into. The Roku has a nice stripped-down interface for Netflix, Sky Now (pay-per-day Sky Sports), BBC iPlayer, Demand 5 (on-demand channel 5) and Sky News.
As you can imagine, all the cables for the AV system looks like a pit of mating snakes! As the new system doesn't need line-of-sight IR remotes it's all neatly tucked away in a cupboard.
RaspbPi Control System
<spoiler alert> this section gets a little bit propeller head when describing the system with a fair bit of technical jargon, feel free to skip to the next section if this isn't your cup of tea!
The Raspberry Pi has a standard Raspbian Wheezy OS and uses the WebIOPi "Internet of Things" framework to serve up a mobile website (jQuery mobile + HTML5 + CSS3 + JavaScript) to any smartphone or tablet on our home WiFi. The mobile website is used to control all connected devices and to see the status of most devices.
The WebIOPi framework provides a neat JavaScript interface between the mobile website on the phones and custom Python script on the Pi to communicate with the AV components. The Python script can also check things that are connected to it, like the motion sensors & door/window switches to decide whether to log any changes or use APIs to send push notifications or SMS to our phones.
The Raspberry Pi sends commands via:
- infra red to the the AV switch (IR capture/playback handled by LIRC)
- RS232 to the projector (the WebIOPi framework handles this with a few lines of custom script)
- HTTP to the Virgin box, the Panasonic surround-sound and the Roku media streamer
The phones/tablets cannot send HTTP commands directly to AV devices as they are constrained by the Same Origin Policy, so the Pi proxies the commands which are a mix of GET, POST and PUT verbs.
The jQuery mobile website is written using a multi-page template in a single HTML file and uses HTML5 appcache to cache images, CSS & JavaScript to keep the startup time as quick as possible.
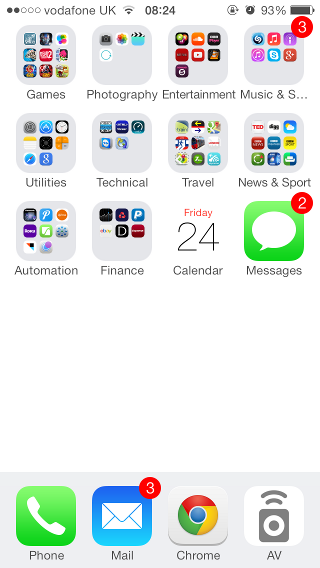 As me and my wife both have iPhones & iPads we can add the mobile website to our phone homepage so it can be launched like an app (see the AV icon on the right of the app dock tray).
Aside from jQuery mobile, the only third-party tool that is used on the mobile website is a touch gesture plugin called Toe.js that supports tap & swipe with detection for number of fingers being used. I will explain how this is used in one of the later sections.
Most of the brains of the system is done by JavaScript in the mobile website on the smartphone leaving the Python script on the Pi as a fairly dumb message-agnostic forwarding device.
The main reasons for this are the same origin policy mentioned earlier and that it's significantly easier to debug a system like this using a laptop browser than exclusively reading Python logs on a Pi. Before this project I had also never written a line of Python and writing a message forwarder seemed like a reasonably straight-forward starting point!
Home Screen
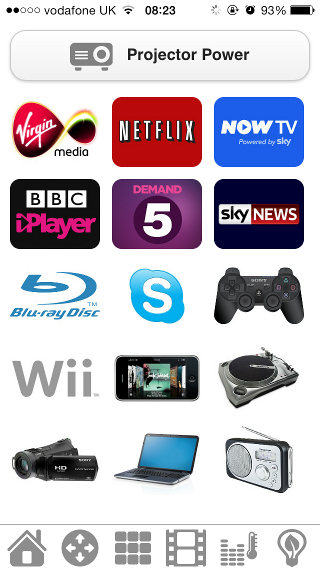 When the mobile website is launched the home screen presents a range of 'things to do', eg: watch Netflix, play on the Wii, listen to records etc.
In the background JavaScript commands are asking the Pi for the power status of the projector and the Panasonic surround system, which takes 2-3 seconds. When you tap the 'Projector Power' button you are asked if you want to turn it on/off, depending on the current state. A full projector power on-then-off cycle can take up to two minutes so it's best to ask first!
Tapping any of the other icons will instruct the Pi to set the projector to the correct video input, the Panasonic to the correct input and, if needed, the AV switch to the correct input. If a Roku app is selected (eg: Netflix, Sky Now etc) the Pi also instructs the Roku to launch that app. As some inputs are louder than others the Pi will also change the Panasonic volume accordingly.
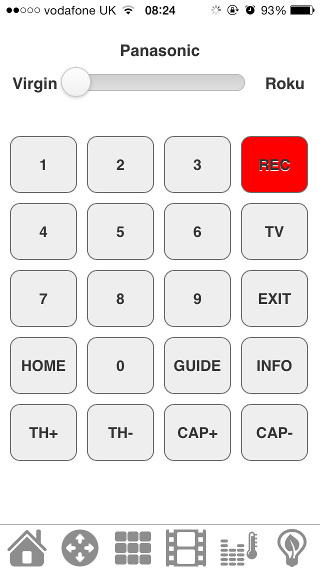
Control Screen
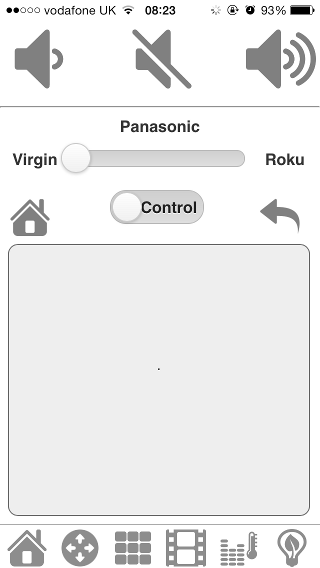 At the top of the control screen are large volume & mute buttons to change the Panasonic volume, the main section has a large gesture pad, home/back buttons and device/mode sliders.
Once you have selected your 'thing to do' on the home screen the control screen is automatically displayed and the device & mode (control/cursor) sliders are also set automatically. If the chosen 'thing' doesn't involve the Virgin box, Panasonic or Roku then just the volume strip is shown.
To control the selected device you intuitively tap & swipe the gesture pad with these gestures being interpreted by the Toe.js plugin mentioned earlier.
With the mode slider set to 'control' you can tap to play/pause, swipe right to fast-forward, left to rewind and two-finger swipe to skip forward/back. When the mode is set to 'cursor' you simply swipe up/down/left/right to move the cursor on the device that you're controlling and then tap to select/OK.
Based on the slider positions and the gesture you made (or the home/back button you pressed) the JavaScript on the phone knows which commands to send to the device you want to control, via the message forwarding script on the Raspberry Pi.
Keypad Screen
 There's sometimes a few off-piste things that require more than gesture control and home/back buttons, like turning on captions (subtitles), entering digits (enter channel numbers, child-lock pin numbers etc), recording programs, etc... that's where the keypad screen comes in.
A slider at the top lets you choose which device to control and then displays 20 buttons per device. We tend to stream most of our movies or watch them on live TV, so don't have much need to record programs. We have also found that the TV guide screen does away with most of the need to enter digits.
TV Guide Screen
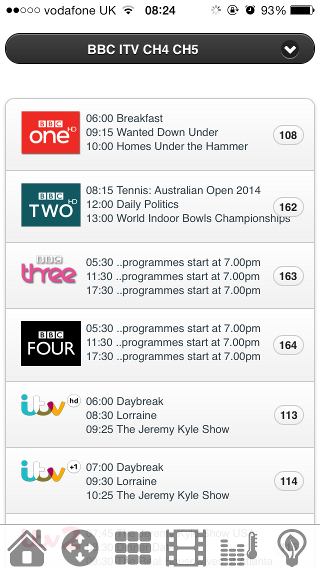 On the rare occasion that we sit down to watch TV (aside from scheduled sports or films) we might been in a mood for comedy, drama, a documentary or even putting a kids channel on for our son.
The Virgin TV guide is a pain to use and doesn't have channels grouped by type... Sky does a slightly better job, although one still needs to wade through many pages of channels to see what's on.
The Sky app has a good "now, next and the thing-after" guide, so I reverse engineered how the app gets the information (and channel logo) from the Sky web services and then mapped the Sky channels to Virgin TV channels that we subscribe to (not that many, as we're on the smallest TV package).
When you select the TV guide screen the channel information is extracted from the Sky services and displayed on the phone/tablet in a simple layout with a dropdown to select channel type (eg: drama, film) followed by a list of channels for that type. When you tap on a channel the phone then instructs the Virgin box to switch to the relevant channel.
EQ and Heating Screen
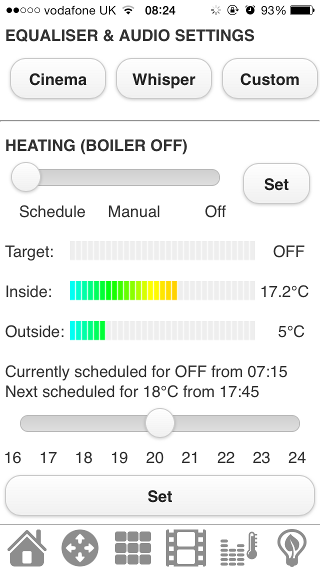 While there are many audio settings on the surround sound system (frequency curve, Centre Focus, Subwoofer volume etc) we found we were using two main combinations of settings that we have called 'Cinema' and 'Whisper'.
'Cinema' uses a flat frequency curve for the main speakers with the subwoofer turned up to 75%, whereas 'whisper' (mainly used at night-time) has a bass-cut frequency curve and turns down the subwoofer and directs most of the sound to the rear speakers.
Tapping the 'Custom' button slides down a control panel where you can tweak with the audio settings to suit the film/sport.
The heating section replicates the functionality from the British Gas Hive app* to keep all the controls for our house in one place.
You can set the boiler mode (schedule/manual/off) and specify a temperature setpoint. The three bars in the middle display various temperatures as reported by the Hive system and text near the bottom displays the current/next scheduled operation.
* British Gas have said “When we are good and ready we will be exposing services and all capabilities through APIs”. For now I have reverse engineered the API used by the Hive app, although I won't be publishing what I found as I don't think it's very secure and it's probably (hopefully!) going to change before they release the full spec.
Lighting & Power Screen
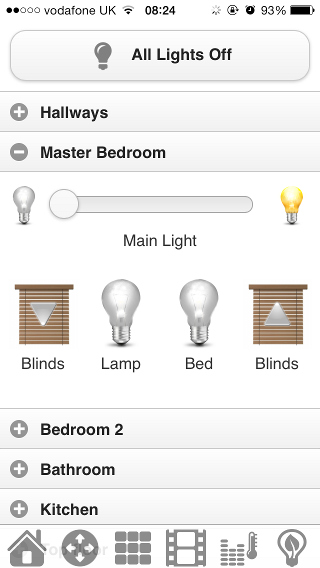 This screen also replicates functionality of another app, this time the LightwaveRF app, again to keep all the controls for our house in one place.
You can choose which device in which room that you want to control or alternatively turn all the lights off with a single tap.
In the master bedroom we have a main light which is dimmable, a corner lamp which switches on/off and a couple of Ikea LED gooseneck reading lights on the bed. We will be adding blackout roller blinds in the coming months.
In the kitchen we have a pair of LightwaveRF power sockets for the espresso machine (it has a 10 minute warm up time) and the kettle so we can get the weekend morning coffe & tea partly made before we get out of bed!
We also have 4x LED gooseneck lamps above our cupboards, also controlled by a LightwaveRF socket, which provide a much better light than the main light in the centre of the kitchen.
In the coming weeks we'll be trying out a couple of motion sensors and door/window switches for security and to also gently bring up the hallway and toilet light for a few minutes in the wee hours, without having to fumble for light-switches.